Build a Personal Website in an Afternoon
If you’ve ever wanted a personal website; a place to showcase your experiments and opinions, away from pre-configured themes and terribly named domain postfixes, Jekyll, Kramdown, SASS, and Github Pages may be just the tools for you. The following post will present, in a thoughtful and concise manner, the material needed to get a website up and running at yourname.github.io.
Tutorial Overview
By following this tutorial, you will learn how to use git and github to manage your code, html to structure pages, sass to style them, and jekyll to dynamically smash html together. First, we will setup by installing ruby, git and electron. If you want to use a different method, or already have ruby and git installed, that is excellent. The github.io domain is free to use (see pages.github.com,) and beats having to worry about domain renewal once a year.
Technically, the setup phase could be skipped entirely, and all development could occur within Github. Development on desktop is faster and encouraged as changes can show up immediately on our localhost, and your page will be built with each file-save, compared to a soft limit of 10 page builds per hour on Github Pages.
Once all our tools are ready, we will develop our site by modifying the html and css provided by the Minima theme. This tutorial does not utilize the gem-based minima theme; to understand why we are changing things, it is important to understand how Jekyll/SASS compiles your work into static HTML and CSS.
Finally, we will author a simple post with markdown, and enjoy the beautifully formatted final output on your new website!
Why use Jekyll? ask Parker, the creator.
Prerequisites
- A stable Operating System that can deal with development tools reliably.1
- Basic version control skills. This 10-minute read is a great place to start, and enough for this tutorial.
- A github account, preferably created with your university email to take advantage of the Github Student Developer Pack.
| Please be aware that git and Github are separate entities; git is a version control system, to reliably track changes to a codebase. Github is a hosting site for remote git repositories. Both are excellent development tools. |
| The Github Student Developer Pack contains a plethora of free development tools from major vendors, including Amazon, Microsoft, Digital Ocean (cloud hosting,) Hackhands (live programming help,) NameCheap, Stripe, and the Unreal Engine. Access requires proof of enrollment at a learning institution. |  |
Table of Contents:
Setup
Prepare Your Development Environment
Any operating system will do.1 Install the ruby development tools for your Operating System of choice.
On Windows 10, download and install:
On Debian, run the following command as superuser:
apt install ruby2.3-dev git build-essential make gcc g++
On MacOS, do:
- Install developer tools:
xcode-select --install - Install homebrew:
/usr/bin/ruby -e "$(curl -fsSL https://raw.githubusercontent.com/Homebrew/install/master/install)" - Install Ruby and Jekyll
brew install ruby - Apparently there are a few snags you can hit, but I can’t verify these due to my lack of a Mac.
On all operating systems:
Once you have installed git and ruby, you’ll need to install a text editor and the required ruby gems, named bundler and jekyll. Gem is the package manager for Ruby, and if you installed it in the steps above, it should now be available in your command line.
- My favourite for beginners, due to simple integrated git controls, is Atom.
- Run
gem update, followed bygem install bundlerandgem install jekyll. - Switching to Gem version 2.7.3
gem update --system 2.7.3may help if you encounter errors when installing bundler and jekyll.

Create a Github Account
Again, students should create an accout with their university email to take advantage of the Github Student Developer Pack..
Setting up SSH keys may seem like a complicated and unneccesary step now, but it’ll save you from having to enter your password ten thousand times and is a worthwhile step to take.
In your home directory, run ssh-keygen -t rsa -b 4096 -C "email@email.com" (with your personal email,) on the command line or Git Bash on Windows. Keep hitting the ENTER key to accept all of the default values. Copy the contents of the generated id_pub.rsa to the SSH and GPG keys section in your Github account settings. Now, when you push and pull to github, you won’t need to enter a username and password.
Also run the following, in git bash (Windows,) or the command line:
git config --global user.name "First Last"
git config --global user.email "email@email.com"
git clone ssh://git@github.com/UserName/RepoName.git
A better guide for setting up these keys is available here for troubleshooting.
Download Minima.zip
Save it in your downloads, we’ll be using it soon.
Development
Set Up Your Repository
The following steps, explained in detail below, will cover creating a repository, uploading the neccessary files, and viewing your new live site:
- Create a new github repo yourname.github.io, and clone it to your machine.
- Extract all (including hidden,) files from minima.zip to the cloned folder.
- Push your changes to github and your site will automatically generate. Done.
On Github, create a new repository named yourname.github.io, and set the .gitignore to Jekyll. A .gitignore, like the name suggests, ignores some files in your repository so unneccesary local scripts/configs/compiled files aren’t shared between machines.

Now, clone your new repository to your computer by navigating to your documents folder and running the command git clone git@github.com:username/username.github.io.git
Still have that Minima-master.zip? After ensuring your file manager is showing all hidden files, delete .gitignore from the minima folder, then copy the contents of the extracted minima folder to your site’s repository.
To upload your changes, type git add . to let git know about the new files you want to include, then git commit -m "Initial Minima upload.", and finally git push. Your changes are now being uploaded to github, and your site should be available in short order.
Check that your site has been compiled properly by checking Github:
-
Click the commits button to view the latest changes to the repository.

-
You should be able to see a green checkmark next to the latest commit with a message that indicates success.

If no message is present, you’ve done something wrong. Check the troubleshooting guide at the end of this article.
Customize: Style Your Site
In your _assets folder, a file named main.scss should exist.
From here, you can essentially take the mouse, point it at an object in developer mode to see the class of an item, then style the object with CSS. Below, in the left image, we can see that the section heading for Posts has the class h2.post-list-heading. If we type the following, we can change the color of this item to red, and once we commit our changes, the site will appear as it does in the right image.
main.scss
@import "minima";

.post-list-heading {
  color: red;
}
In the browser, using the inspector, we can see that Posts is now red:
Before the color change commit: 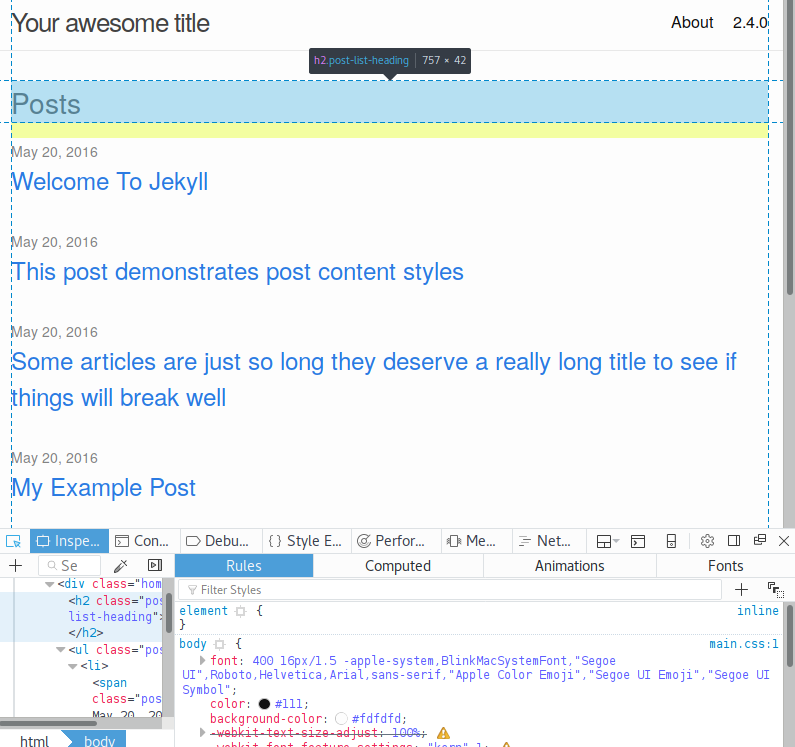 |
After the color change commit: 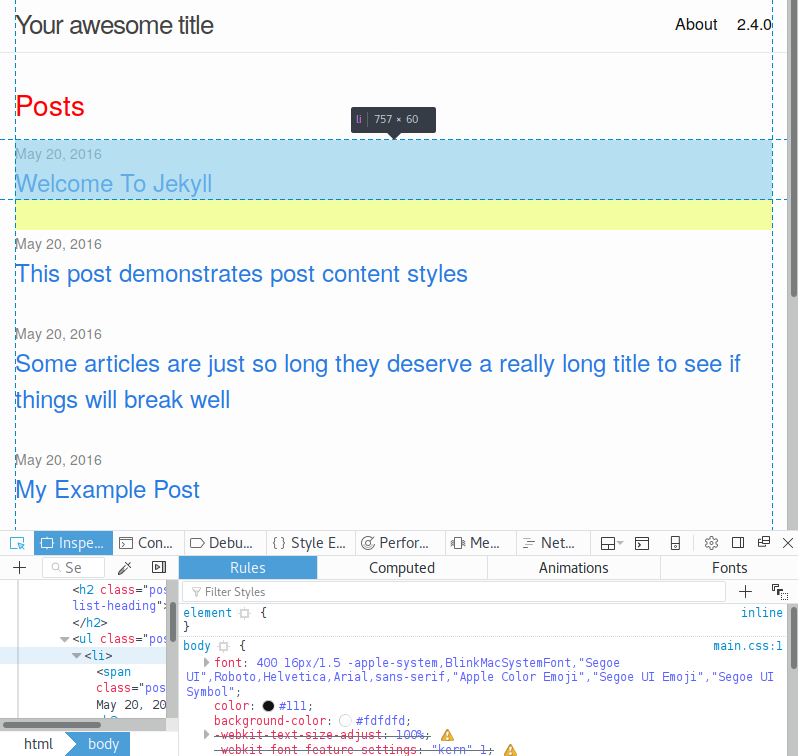 |
If you are familiar with CSS or SASS, this is your chance to let your creativity flow. You can style your whole site, or add SASS mixins’, from this one file. I find that some changes don’t propogate as readily, and rather than adding !important, I reccomend being more specific with the class/name of the targeted part first. If changes are not being applied, feel free to modify the scss in the _sass folder.
To learn the very basics of CSS, I reccomend the interactive tutorial on Codecademy.
Customize: Structure Your Site
Jekyll uses the Liquid templating engine to process files in tandem with html in _includes and _layouts.
When your site is generated, it first looks through the root for .md files filled with content. The final output of each one of these files is a generated .html file. Naturally, the content of the first page users will see is contained in index.md.
Opening one of these .md files reveals a header, called front matter, with some variables set:
---
layout: news
title: News
permalink: /news/
---
Layout allows you to choose which .html file in the _layouts folder is used to render the page. Files in this folder can also be nested inside a parent html file in the same way. Below, we can see the layout html for the markdown header shown above.
news.html
---
layout: default
---
{%- assign date_format = site.minima.date_format | default: "%b %-d, %Y" -%}

<div class="card title">
  <h1>Ryan Fleck</h1>
</div>

<div class="card navigation">
  <h2>Navigation</h2>
  <ol>
    <li><a href="{{ site.url }}/experiments">Experiments</a></li>
    <li><a href="{{ site.url }}/discourse">Discourse</a></li>
    <li><a href="{{ site.url }}/tutorials">Tutorials</a></li>
    <li><a href="{{ site.url }}/archive">Archive</a></li>
</div>

{%- for post in site.posts -%}
<div class="card news">
  <h2><a class="post-link" href="{{ post.url | relative_url }}">{{ post.title | escape }}</a></h2>
  <span class="post-meta">{{ post.date | date: date_format }}</span>
  {{ post.excerpt }}
  <a class="readmore" href="{{ post.url | relative_url }}"><i>...read more.</i></a>
</div>
{%- endfor -%}
You’ll notice that the html above contains for loops, relative links, and variables set. More about Liquid Templating can be found here. Also note that layout: default is included at the top of the page; this prompts the engine to nest this piece of html inside the contents of default.html, shown below:
default.html
<!DOCTYPE html>
<html lang="{{ page.lang | default: site.lang | default: "en" }}">

  {%- include head.html -%}

  <body>

    {%- include header.html -%}

    <main class="page-content" aria-label="Content">
      <div class="wrapper">
        {{ content }}

      </div>
    </main>

    {%- include footer.html -%}

  </body>
</html>
Important Things to Note
- The html in
_layoutsare page layouts, and are typically nested insidedefault.html. - The html in
_includesare snippets for globally shared parts like headers, decoration and tracking. - HTML in
_layoutsmust include{{ content }}where the child layout is to be inserted.
Add Some JavaScript
Include a script at the end of your default.html like so:
<script src="/assets/rcf.js"></script>
…and have fun. Here’s what you’ll see if you open the console of your browser right now.
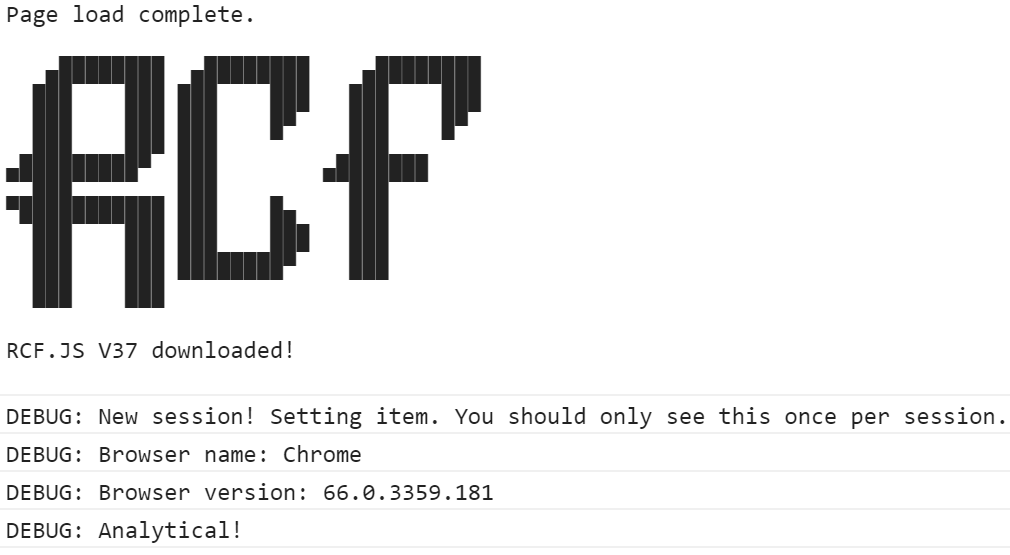
Do remember that the more JavaScript you use to manipulate your site, apart from fun extras and experiments, the more prone it is to all sorts of failure. The less you use, the better, and please for the love of whatever deity you pray to, don’t implement some JavaScript frontend without a basic html/css failsafe.
Recommended Tweaks
Consistent Footnotes:
If sticking with the default minima font, Windows 10 will render the reverse-footnote ( ↩ ) wilh a strange, emoji-like character. To bypass this, change the site font, or add an exception for this element in main.scss:
.reversefootnote,  .footnote{
  font-family: sans-serif;
}
Take Control of the Navigation
To choose the specific appearance and order of pages in the navigation, modify the _config.yml file and uncomment the header_pages: line.
header_pages:
 # - about.md (Does not appear.)
 - experiments.md
 - discourse.md
 - tutorials.md
 - archive.md
Utilize Your Creation
Write Some Posts
Until this section is completed, please refer to the official Kramdown tutorial. The default Rouge syntax highlighter supports a wide variety of languages. In most cases, using a language’s common file extension will give good results, but for some (erlang, lisps,) it is better to refer to this list of officially-supported languages.
Google Analytics
Until this section is completed, please refer to this blog post.
Share Your Site
If this is a showcase for personal projects, it’s more important for the site to be populated than popular. Still, if you’re eager for the general public to read your work, consider linking to your own articles in forum discussions, or on various social media platforms.
Troubleshooting
Site Won’t Build?
Check the repository settings for errors, and set the minimal theme, which is identical to Minima and will help fill in any gaps (where gaps are files that have not been included.)
Time Test
Last update: Tue, 17 Mar 2020 21:33:19 +0000
FUBAR
If the site goes FUBAR, it’s probably Windows line endings. Fix in GNU/Linux:
find ./ -type f -exec dos2unix {} \;
Site Regenerates Slowly
You can utilize the following flags to limit the amount of processing that needs to be completed, and limit the number of posts the engine renders.
exec jekyll serve --drafts --watch --limit_posts 5 --incremental

Hmmm, that didn’t do it…
Well, if you’ve made it this far, you should have a fully functional website with a bit of content; the perfect place to showcase personal projects and musings. I hope that you’ve found this post useful. Please contact me with my current contact information, displayed in the site footer, if you have any questions about the article. For technical questions about Liquid, Jekyll, Kramdown or HTML/CSS, please consult google first, after which I’ll be happy to help troubleshoot.
Thanks for reading,

-
Operating System: My personal favourite OS being Debian. I have a personal bias against development on Windows, but encountered no problems setting up git, ruby, and electron on a clean install. Most software is deployed on some sort of GNU/Linux anyhow, so I feel development on this platform is best.s ↩ ↩2